 Best Practices
Integrating Google Forms into your website
If you’ve ever tried to create your own web forms for data collection, you know that it can sometimes be a little arduous. Not only do you need to create the form, but you’ll also need an SMTP email server to relay the information from your site to your inbox. And once you’ve gotten the data, you need some way to transfer it to a database to make good use! That can be a tall order for a web newbie!
That’s where Google Forms can be a great solution to do the heavy lifting for you. Google Forms are easy to build, easy to edit, easy to integrate, and easy to collect and review data.
- To start, just head to https://docs.google.com/forms/ and log in using the account that will own the form.
- You can choose from some pre-built templates or start from scratch to build your own.
- Use the artists palette icon at the top to set some theme items – a logo of your organization at the top and your branded colors hex codes for the background and colors.
- Populate your questions. Be conscious of the fact that every piece of data you request is adding a little bit of friction to the users completing the form. Be thorough but not exhausting. If you’ve asked for data of birth, for example, there’s no need to ask for age also. Consider whether the questions should be multiple choice or multi-select and always consider adding an “Other” option.
- Preview and test the form yourself a few times to be sure the sequence and wording of the questions makes sense.
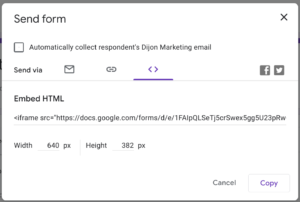
- Click the “Send” button at the top and choose the Embed option. Copy and paste the iframe code into your website’s HTML code.
- Lastly, head to the “Responses” tab, click the three dots in the upper right and click on “Get email notifications for new responses” to be notified any time someone fills out your form.
By letting Google Forms do all the work, you can focus on using the data instead of spending too much time figuring out how to collect it.